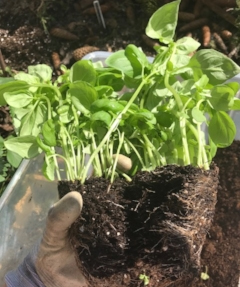
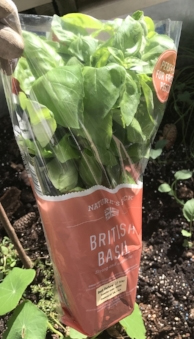
So you’ve brought that lovely looking fresh herb plant back from the supermarket, proudly taken the wrapper off, lovingly watered it and talked to it, but days later it’s almost dead. Sound familiar? Don’t panic, because it’s not your fault! The supermarkets grow these herbs under steroid lights and jam pack the pots with seeds, so what looks like a strong healthy plant can sometimes be up to 20 plants squeezed into a small pot. These plants are competing for light, oxygen, water and food. In such a cramped environment it’s understandable that your lovely new healthy herb plant isn’t destined for longevity. But we can sort this! If you follow the below, you will have lots of new herb plants that will last and last and last (as long as you look after them!)
HOW TO MAKE SUPERMARKET HERBS LAST FOREVER
For me, basil has never survived. It just goes dull and lifeless and I end up binning it. So for this piece I will be using basil as my shining example..
YOU WILL NEED:
1 tablecloth you don’t mind getting dirty
8 little 9cm pots (roughly the same size as the one your supermarket basil is in)
Compost
Funky little planters to pop the pots in
Gloves
1. Remove the plastic cover from around your plant so that you have the pot in one hand, pull the plant (+ soil) out of the pot and pop plant down onto something you don’t mind getting dirty!
2. Fill your other pots with compost so you are ready to re-home your new plants.
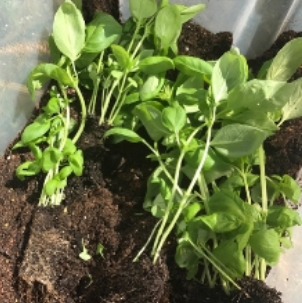
3. Carefully tease apart the basil plant from the roots dividing the root and stems into separate plants. If this is too difficult to do then separate them into clumps of threes or fours.
4. Now using two fingers, squish a hole in the middle of each pot you have filled with compost and pop in one of the bunches of basil you have just pulled apart. Now it’s time to reenact the famous pottery scene from Ghost, minus partner, turn the pot around slowly, pressing down the sides of the compost to make it compact and to keep the new plant in place. Don’t squeeze too hard, just enough to be firm! Now get filling your remaining pots with your remaining new plants. Add more compost if needed.

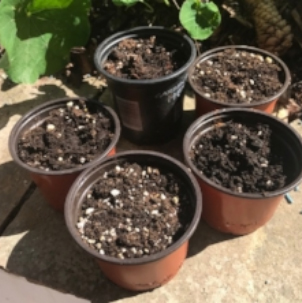
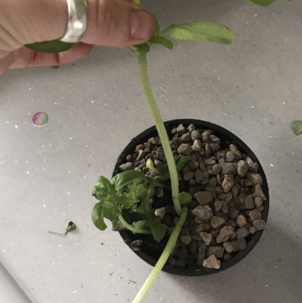
5. You are almost done, give the pots a good soak and leave them for a few hours to drain the water out and to adapt to single life. I bet they’re looking proper droopy, right? These plants have been kept upright in their wrappers, surrounded by their tall leggy friends so now you’ve taken this support away, they just don’t have the strength to hold themselves up. You need to trim them back. This will help the plant immediately, give you new bushy plants and allow you enough to make a good pot of homemade pesto. Cutting a plant back sounds daunting, but it’s a piece of cake! Pinch or cut each stem just above the second set of leaves. This will reduce the plant dramatically. Don’t panic this is good!
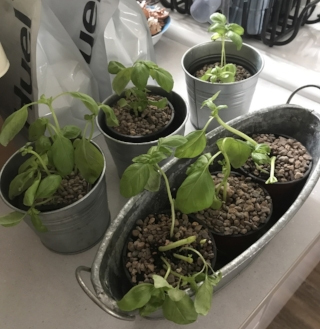
6. Now put your new basil plants onto a sunny windowsill – remember these plants like sun and drought so only water every week or if the soil feels dry. The main thing is never to over water basil as it tends to rot the roots and drown 🙁 Less is definitely more!
SUSIE’S HOME-GROWN PESTO
With all your surplus basil you have just pinched off the top, why not make some pesto?!
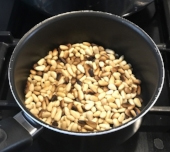
1. First, toast up your pine nuts (just be careful not to burn them like I did..)
2. Add your trimmed leaves, a chunk of Parmesan and your toasted pine nuts to a blender followed by some salt and pepper and a touch of olive oil, et voila! Pop it in the freezer to keep or use it within a couple of days if you’re keeping it in the fridge.
NICOLA’S HOME-GROWN BRUSCHETTA
Forgive me for nosing in, but I’m never one to turn down an opportunity to cook with basil – to me, it just smells of Summer and healthy meals on holiday.
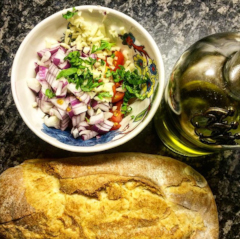
1. Dice a handful of tomatoes (I like cherry ones best) throw them into a wee bowl
2. Finely chop a couple of cloves of garlic, add to the bowl
3. Ditto your basil leaves
4. Option: i’m partial to the inclusion of some red onion, but it’s not imperative. Don’t go overboard.
5. Once everything is in the bowl, add a couple of glugs of olive oil and some salt & pepper.
6. Cut some lovely bread into thin slices and toast. Once the bruschetta mixture has had a wee bit of time to marinate, liberally spoon it onto the bread and enjoy as a starter with chums.
You now have way too many basil plants (unless you cook Italian most nights), so give some of your new fledgling pots to friends as gifts!
Enjoy. Next time, i’ll be showing you how to make recycled bird feeders with your kids to attract wildlife into your garden.
You can keep up to date with Susie’s gardening and general antics on her Instagram @The_Lady_Gardener